


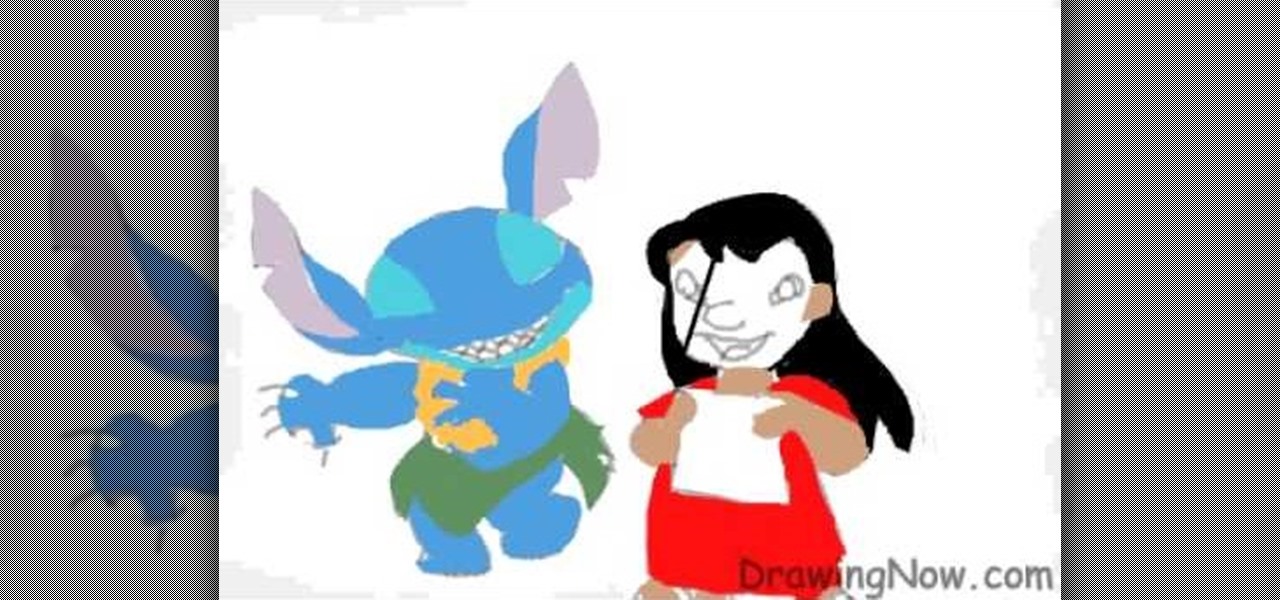
How To: Draw Lilo & Stitch
Begin by drawing an oval and attach two feathered shaped ears to head. Draw guidelines for the face. Draw the face and a marshmallow shaped torso. Add the legs and arms. Add the detail and start erasing the guidelines. Repeat the similar steps for Lilo. Once finished both characters, color them. Add a darker shade of the colors for shading. Outline the characters and add all the details. This video will benefit those viewers who enjoy drawing on the computer and would like to learn how to dra...
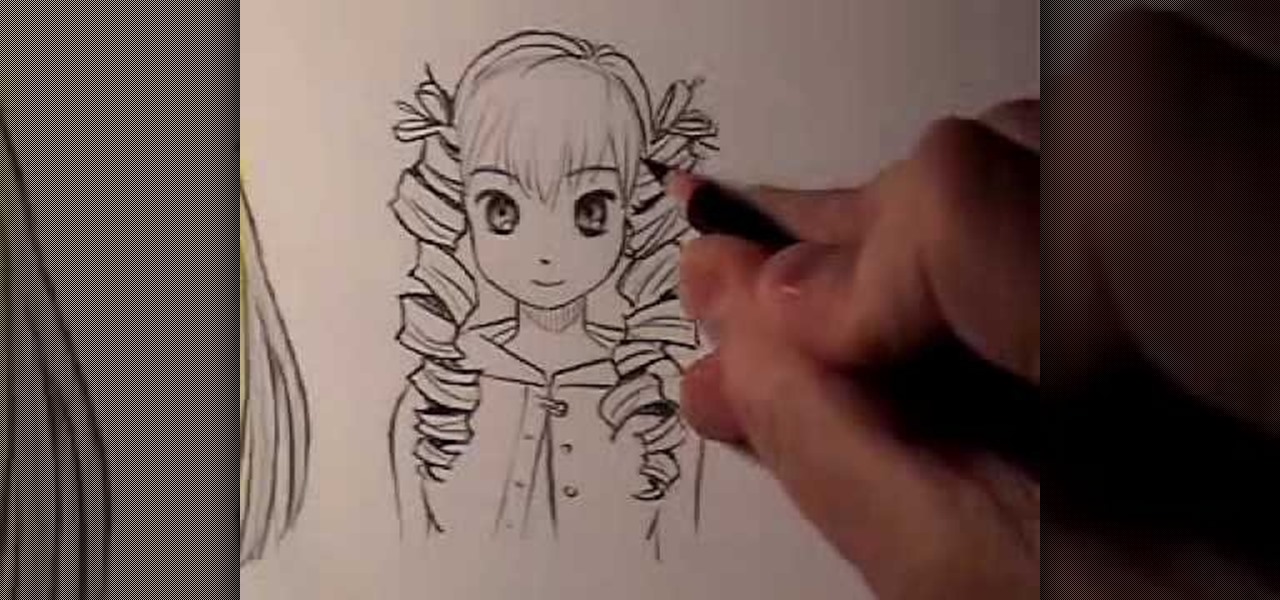
How To: Draw Manga hair (curly vs. straight)
In this tutorial, we learn how to draw Manga hair (curly vs. straight). When drawing the straight hair, you will draw lines first at the top of the head to indicate how the hair is coming out of the head. Then, draw some lines around the head you've sketched. Curve the hair around the body and draw it going behind the shoulders. Draw gentle curves so it looks more realistic. Add in lines in the hair to make strands. For curly hair, start by drawing in different shapes that kind of looks like ...

How To: Draw the cartoon character Plankton from SpongeBob
It's time to discover how fun art and drawing is! Learn how to draw the cartoon character Plankton from SpongeBob SquarePants. Drawing is a way of creating and expressing ourselves, and therefore the result is always beautiful.
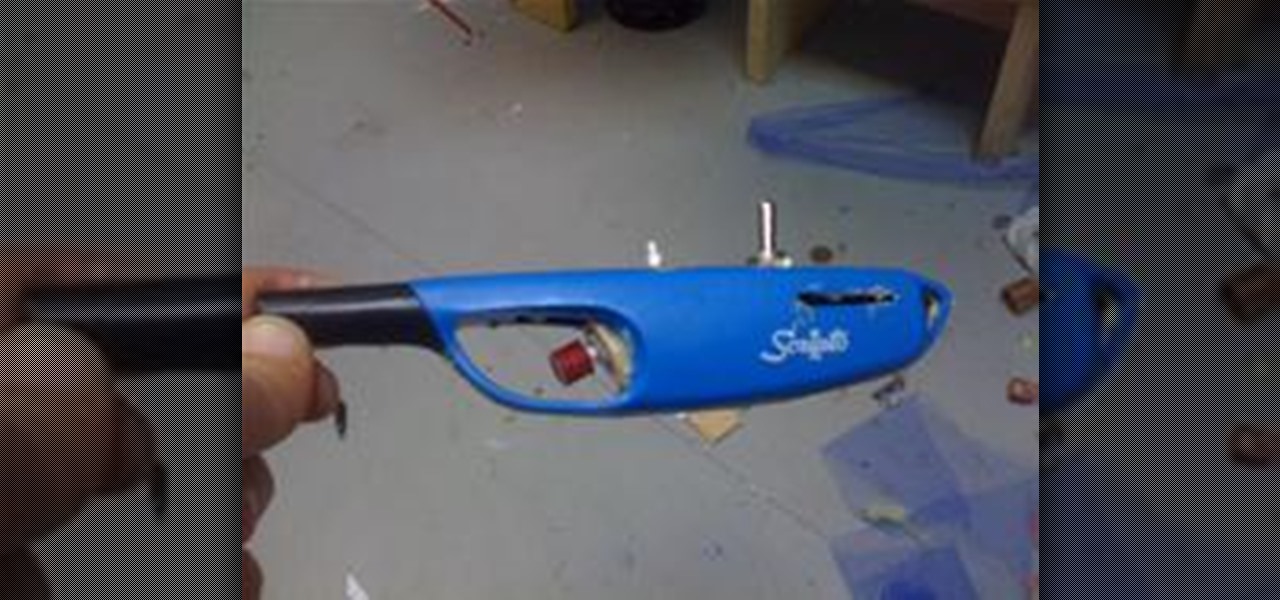
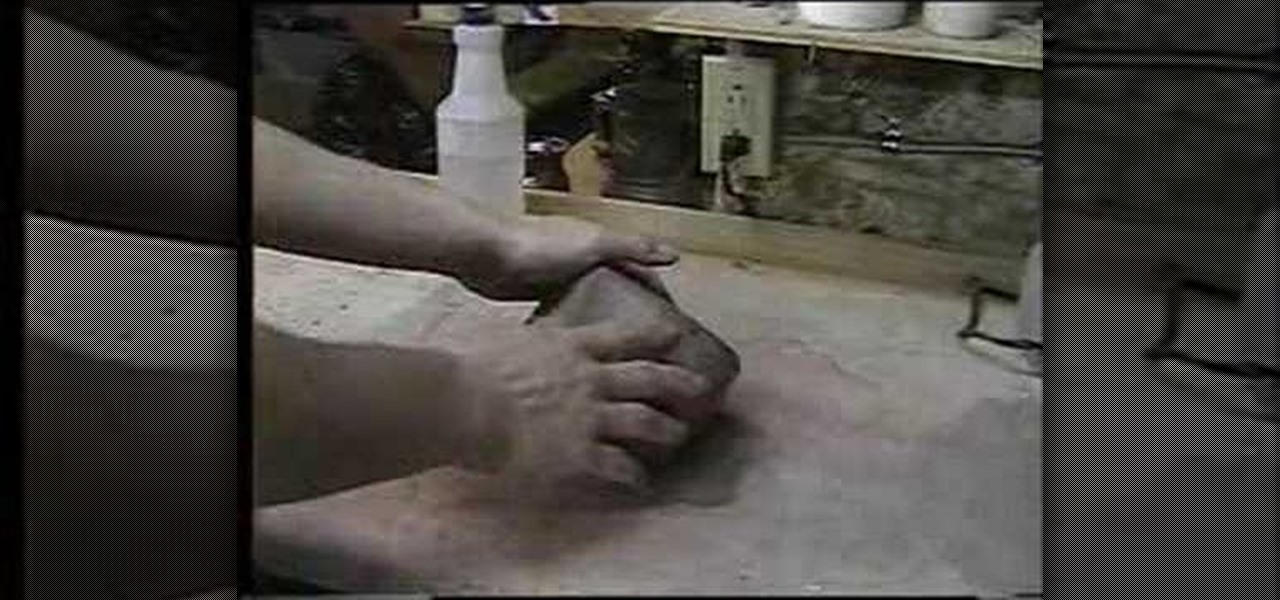
How To: Make a Canon Shutter Release Cable
This article will show you how to make a shutter release cable for a Canon camera. It took me about half an hour once all of my materials were gathered. I came in at a total of about eight dollars. It has three switches and buttons. The black button on mine triggers the auto focus. The red button triggers the shutter. Finally, the switch triggers the bulb mode, or long exposure. This can be used to take astronomical photos that show the movement of the stars in the picture. The release cable ...
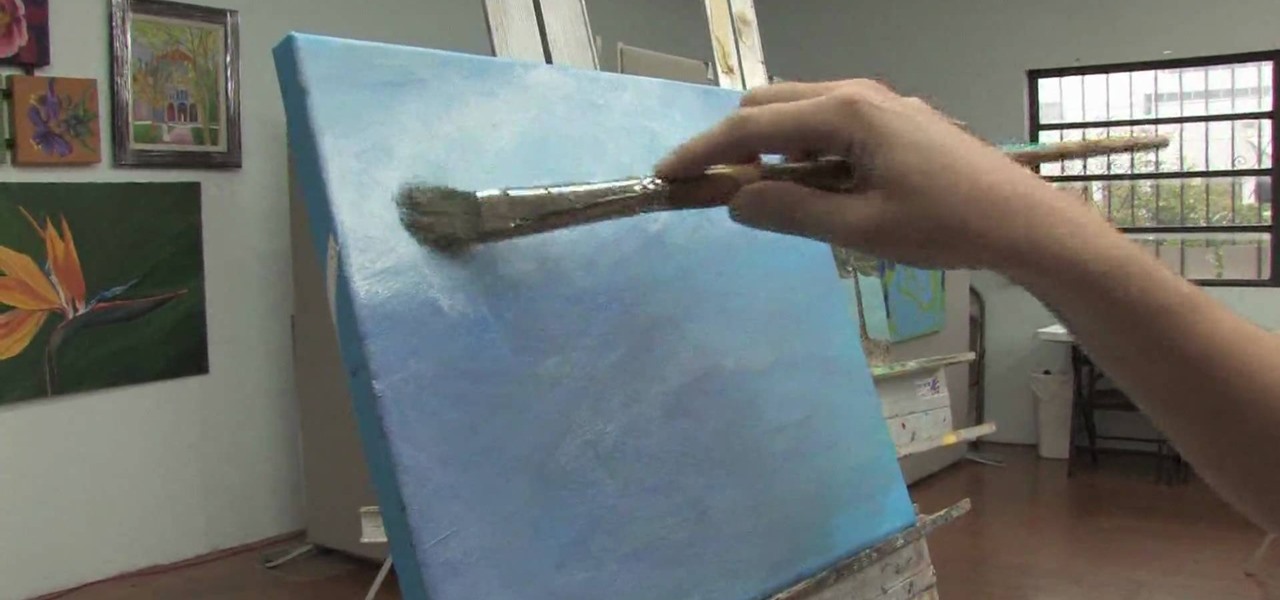
How To: Embellish a painted sky
In this video, we learn how to embellish a painted sky. To do this, use white paint and gray paint. Add some clouds with your paint brush and make them loose and puffy in the sky of a painting. Be very loose and let the blue shine through the white like a regular sky. Paint the tops of the clouds more white than the other parts and paint this throughout the entire picture. If you want to take off some of the embellishment, use blue paint to cover up some of the white you have painted on. This...
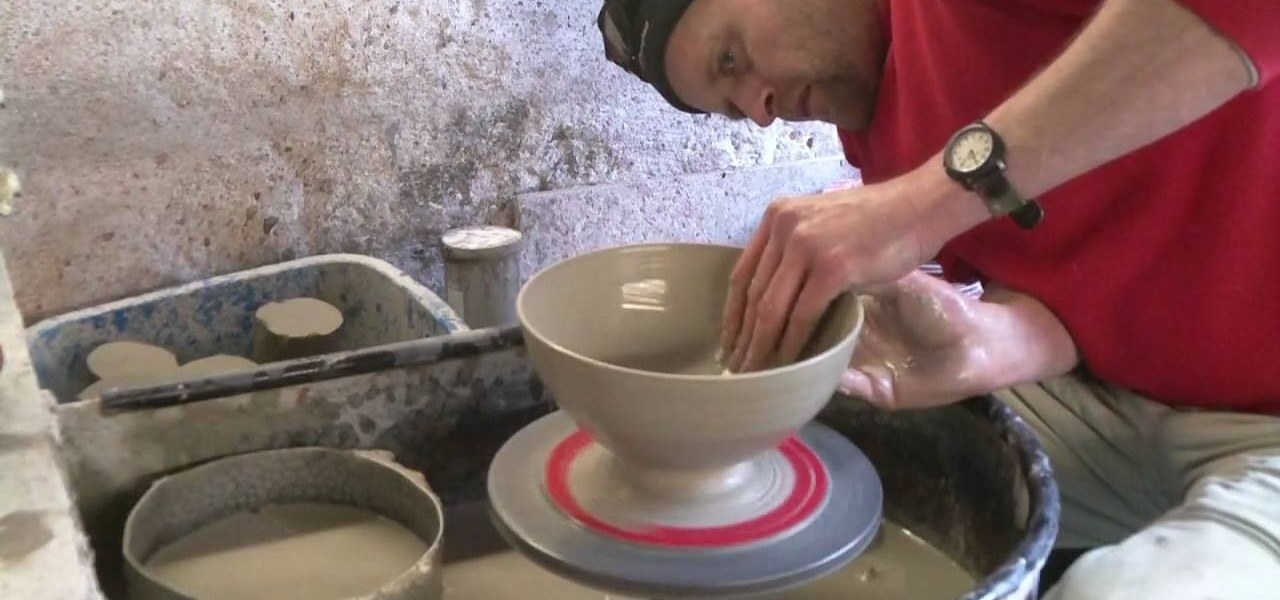
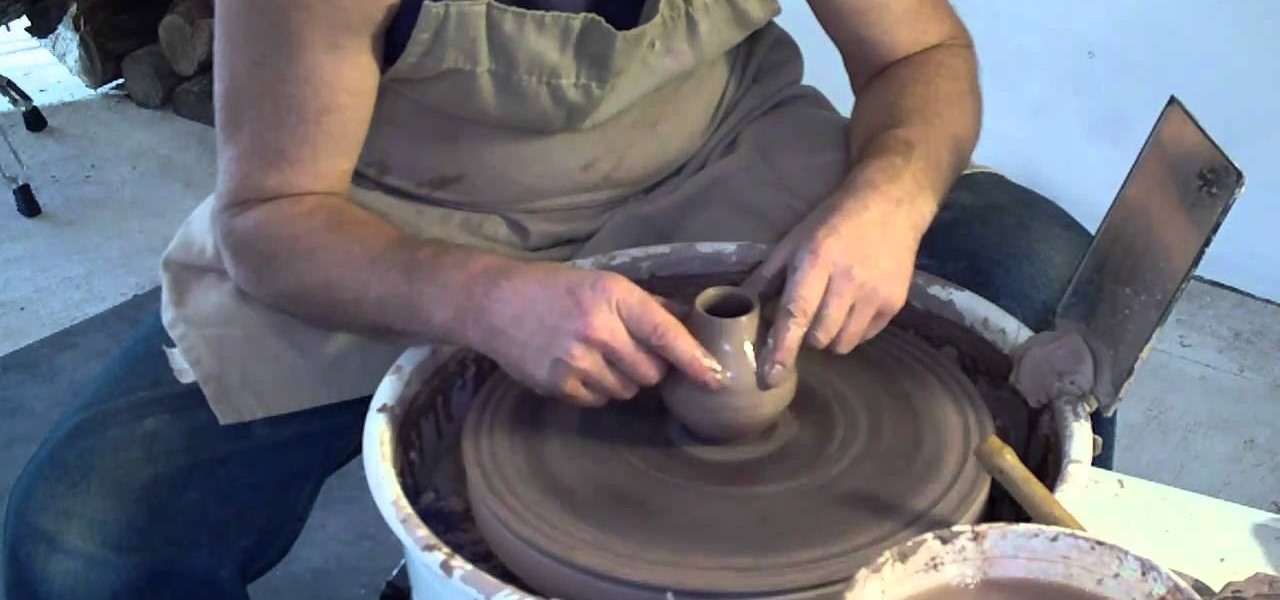
How To: Throw a clay pottery fruit bowl
To throw a clay pottery fruit bowl, place a lump of clay on the potter's wheel and wet it with water. Use the foot pedals to spin the wheel while shaping the clay with your hands. Draw the clay up and then use your thumbs to create an indentation in the center of the clay. Apply slight pressure and the clay should assume a bowl form. Use water as necessary to create the right clay consistency. Draw the clay up to make the bowl walls thin. While shaping the bowl walls with one hand, create a r...
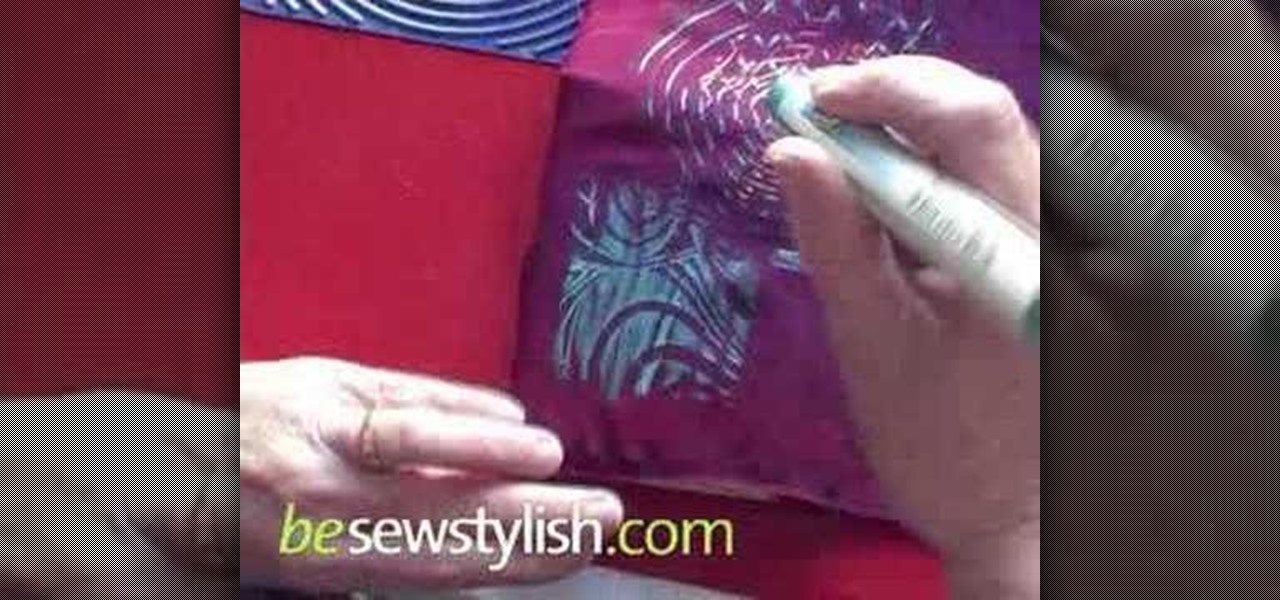
How To: Embellish fabric with paint sticks
Transform any fabric in minutes by using paint sticks to transfer a surface texture to the cloth. Watch as Laura Murray shows you how to use surface rubbings over a textured surface to create original and creative fashions.
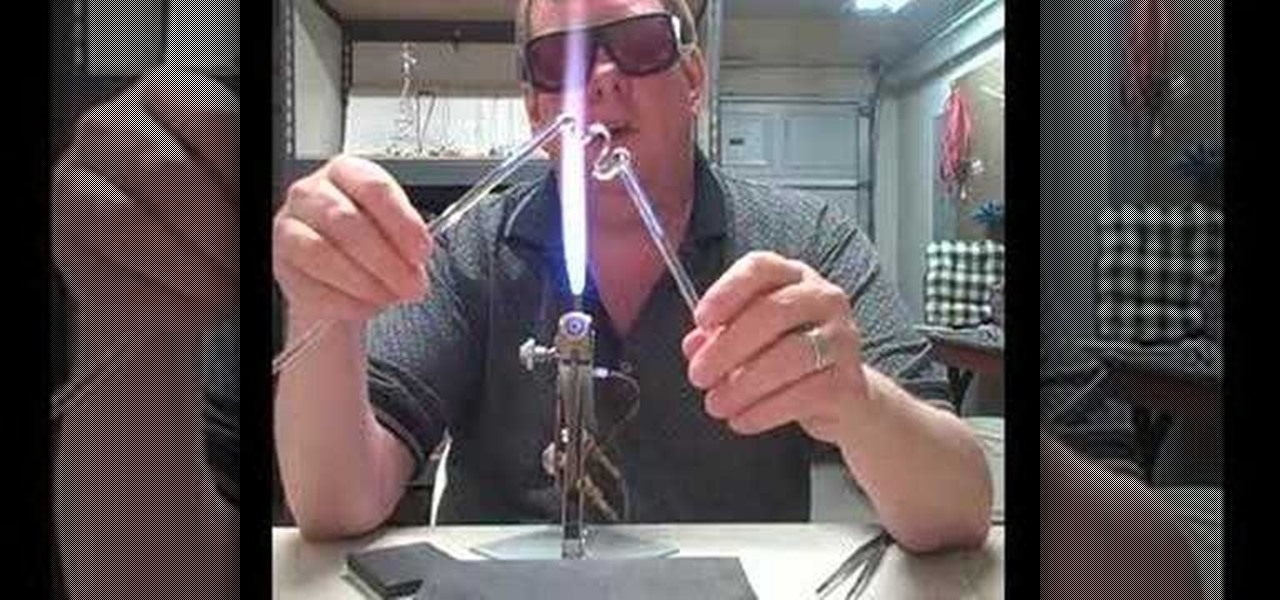
How To: Learn beginning lampworking techniques
Tips for the beginner borosilicate glass artist. This video demonstrates cold and hot seals, pulling curves, and more.
How To: Draw a star
Follow the guidelines outlined in this video to learn how to draw a star well. The first step is to draw a letter V upside down. Secondly move the paper clockwise and draw another V upside down connected to the previous V. Keep repeating this process of turning the paper, until you draw five V shapes, each one connecting to the next one. Finally, you should have drawn your star accurately.
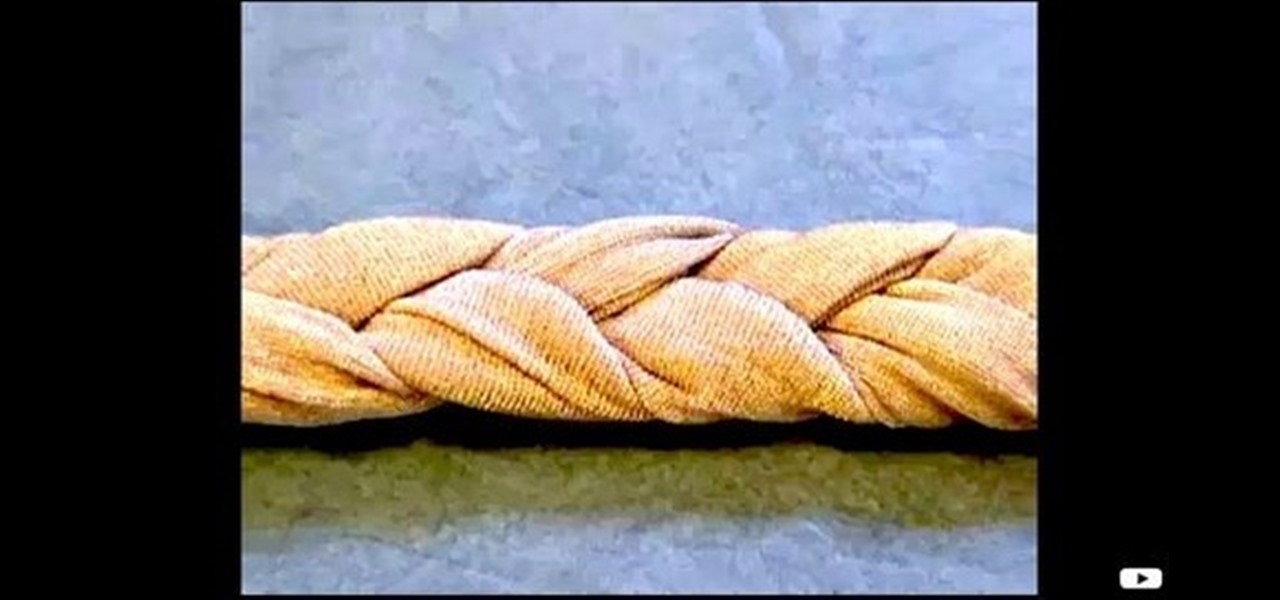
How To: Braid fabric without it fraying
Watch this fashion tutorial video from ThreadBanger to learn how to braid fabric without it fraying. You'll need three strips of fabric, pins, and a sewing machine. You can embellish just about anything with your new braids, and this instructional video will help you braid like a pro.

How To: Draw a cartoon fish
In this how to video, you will learn how to draw a cartoon fish. First, draw a circle for the body. Add a curly fin at the top and bottom. Next, draw a triangular shaped tail at the back. With the basic outline finished, draw in the details of the face, such as the eyes and pointed mouth. Re-trace the outline of the fish with a bumpy line. Next, draw in bubbles near the mouth. Draw details in the fins such as lines running through them. Add some texture lines through out the body. Once this i...

How To: Draw a Beautiful Unicorn
In this tutorial, we learn how to draw a beautiful unicorn. Start by outlining the unicorn, using circles to show where the head and joints are. Draw long lines for the legs and the tail. Then, draw on the point for the head and start to add in the details of the body. As you continue, add the hair on the back of the unicorn and then shade all around the body. Add colors to the unicorn and then start to make the background. Show it in front of a purple and blue background with a large moon, g...
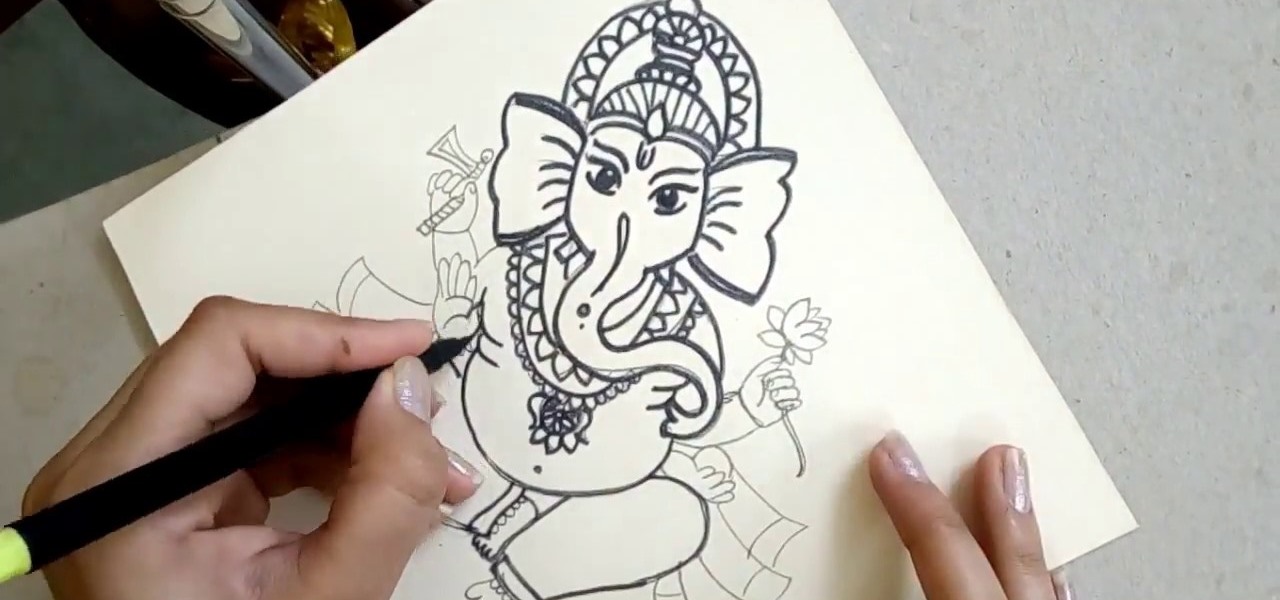
How To: Draw the Sitting Hindu God Ganesha, Step by Step
Personification of the Infinite Consciousness. Lord of Hosts. Master of the Universe. These are just three of the hundred-odd titles of the Hindu god Ganesha. Luckily, drawing the Hindu deity Ganesha isn't so complicated.

How To: Draw a back view of a nude woman
Learn how to draw from a professional artist! This drawing video tutorial will teach you how to draw a back view of a nude woman. This drawing demonstration will help you in the art of sketching and drawing naked women for your art projects. This is the Reilly technique for a back nude pose.
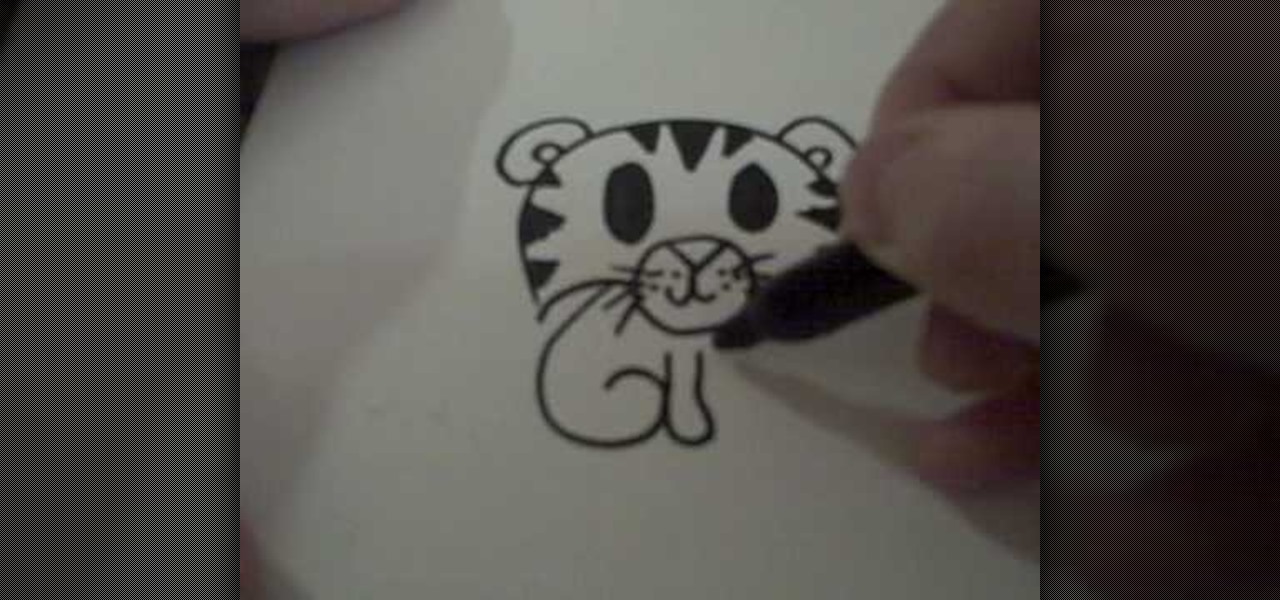
How To: Draw a cartoon tiger
Are you having trouble with your animal drawings? Doodlekat1 shows us how to draw a cute cartoon tiger easily! You will need: blank piece of paper marker or pencil. For the head: Draw a big semi-circle and a small circle in the middle. Connect them using little curves then add the ears. For the nose: Draw a triangle on the top of the small circle then add the mouth, three dots and some whiskers. Draw two big shaded eyes. Draw stripes of varying sizes at the top and the sides of the head. Add ...
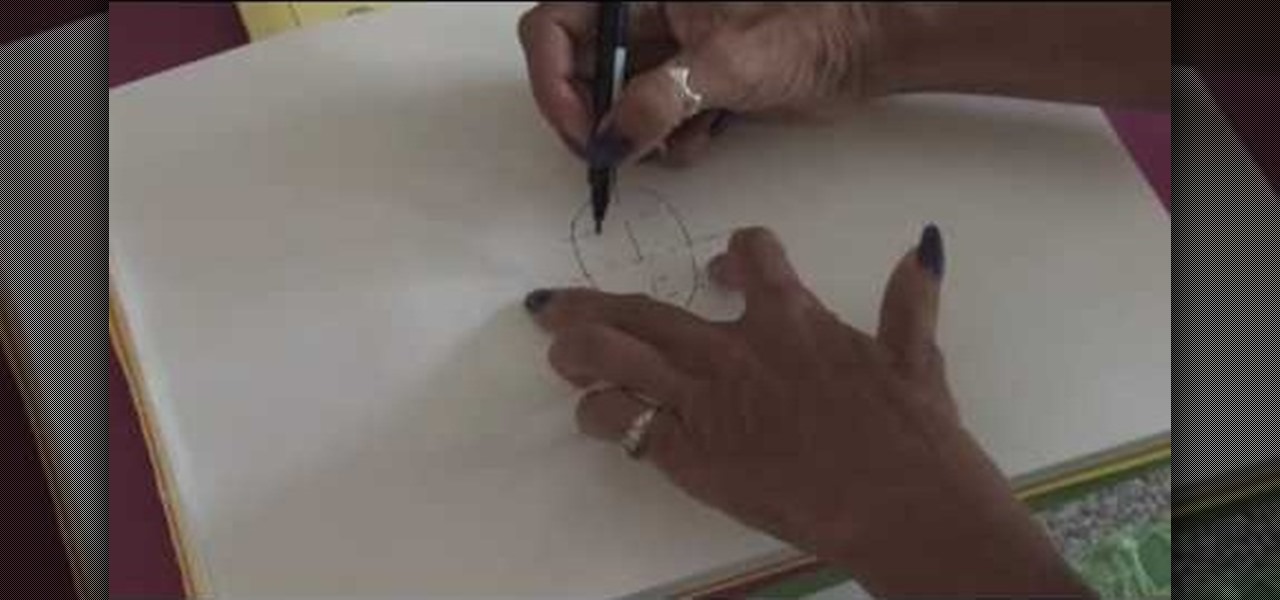
How To: Draw a person's face like a professional
Draw a persons face with this lesson by a professional artist. Start with a basic oval shape. Draw a light guideline through the middle of the face, then a cross line where the eyes might go. Then, draw a line for the nose and mouth. This will leave your drawling divided in three sections. Next, you begin the eyes. Draw oval shapes on the eye line. Then, draw the circles for the middle of the eyes. Then draw in the brows. Next, begin drawing the nose then the mouth. Now you're ready to draw t...
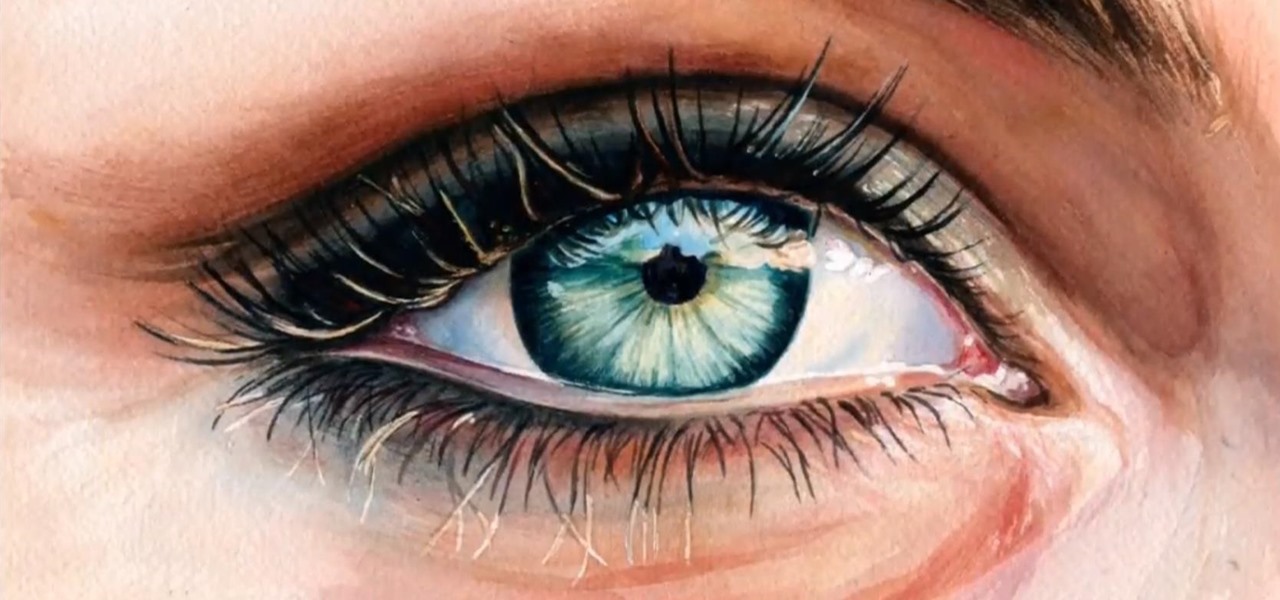
How To: Paint a Realistic Eye with Watercolors
This watercolor tutorial shows beginners how to paint a realistic eye. This video has been sped up 8 times.
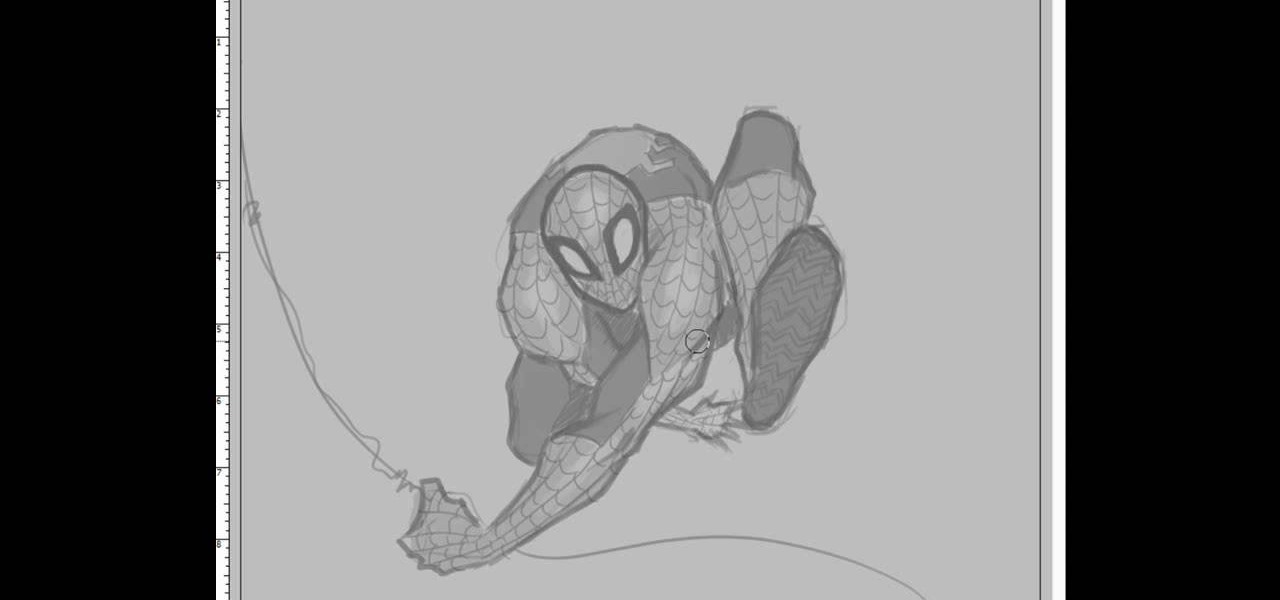
How To: Draw SpiderMan
In this tutorial, we learn how to draw Spiderman. First, draw the outline of Spiderman's body while hanging from a web up in the air. Then, use a darker line to draw over the original sketch of the body. Start to fill in details of the entire body and the face of the character. Next, fill in the small details of Spiderman. Draw the details down to what the bottom of the shoes on his suit look like. Make sure the face has all the right details, then add in lines to the web to make it look more...

How To: Stop Saying "Cheese"! Here's How You Smile More Naturally for Photos
I hate having my picture taken. It's awkward, and I almost always end up thinking, "Is that what I look like all the time?" Most of us think we look awful in photos, probably because we all subconsciously act and carry ourselves a little differently when we know there's a camera on us.
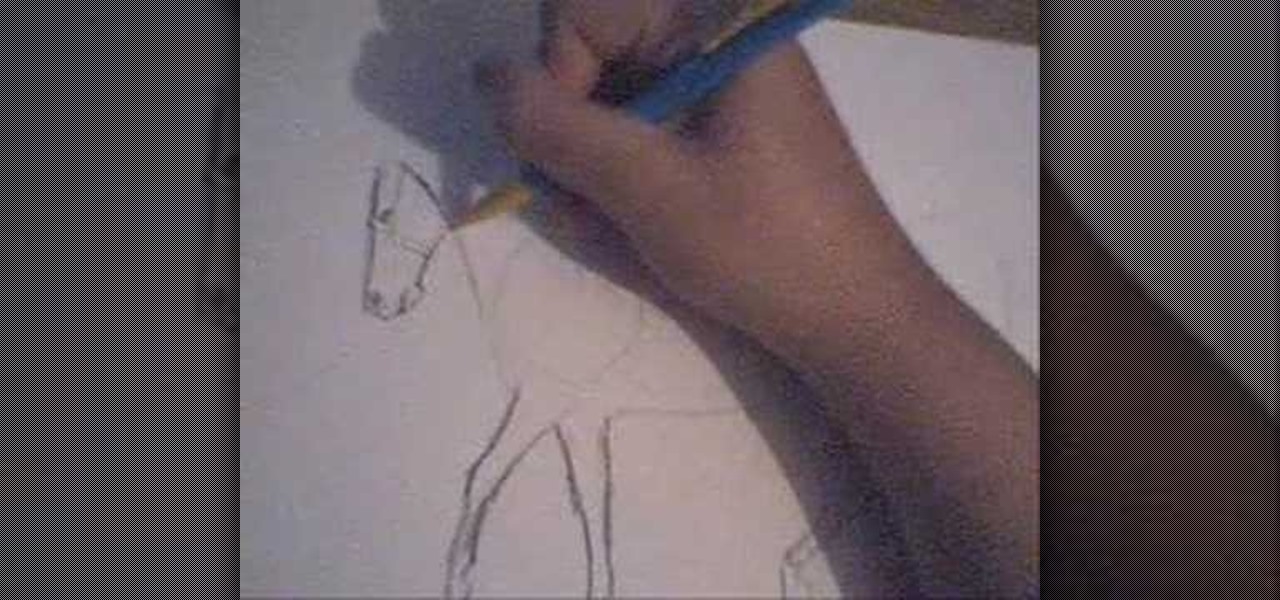
How To: Draw a horse
In this video, we learn how to draw a horse. First, draw the outline of the horse's body. Start with a circle for the head and wispy lines for the rest of the body. Make large shapes that connect to see where the mass of the body will be. Next, draw in the head, tail, back, and legs of the horse. After you have the outline finished, erased the lines inside of the picture. Now, draw in details on the horse. Add in lines to show where the hair is, then draw in the nose and eyes to the face. Als...
How To: Develop Kodachrome Film (B&W Hand Processing & Kodak's K-14 Process)
Remember KODACHROME? That color reversal film from Kodak? The film that was the inspiration for Paul Simon? The only brand of film to have a state park named after it?

How To: Draw an isometric pyramid inside a cube
Fashionable things come and go (remember gladiator sandals?), but truly cool things stay around forever. Take pyramids, for instance. Since the Egyptians (well, arguably, the Mesopotamians) invented them more than two thousand years ago, they still fascinate people all around the world, and the Giza pyramids are still one of Egypt's top tourist traps. And songstress Charice recently devoted an entire song to pyramids.

DIY Photo Processing: How to Develop Film at Home for Cheap Using Coffee, Red Wine, or Tylenol
Not many people use film cameras anymore, so it can be hard to find the materials to develop your own photos at home since most local camera stores are closing. But it's actually relatively easy to make homemade developer, and you can make it with a few relatively common ingredients.
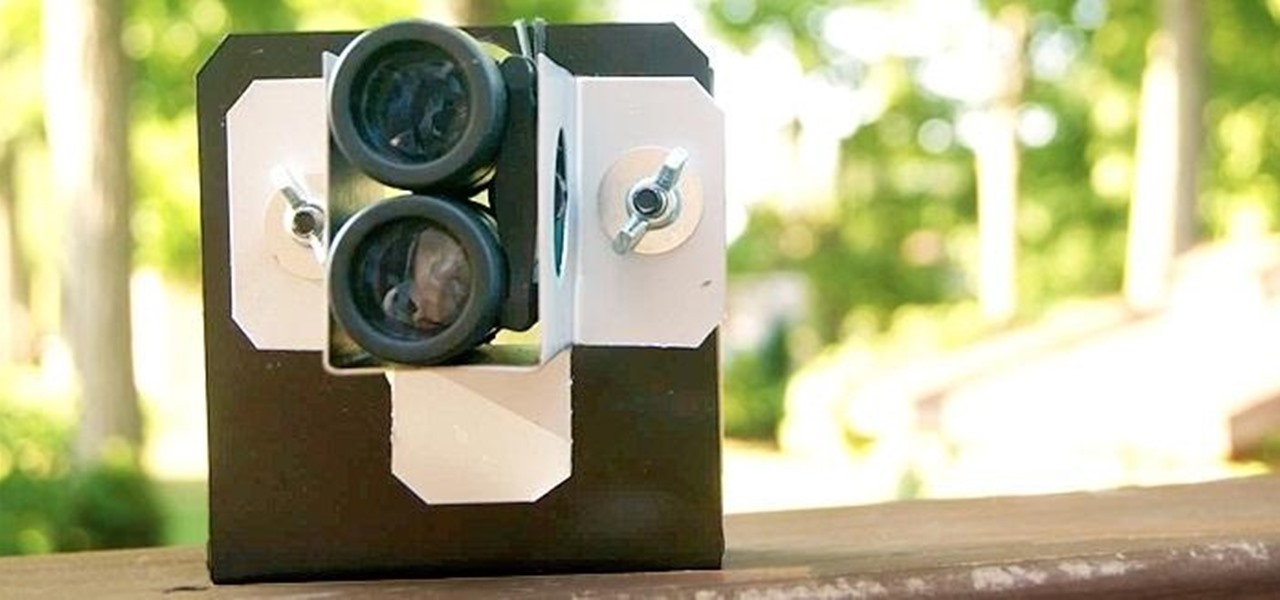
How To: Build a Cheap and Easy Optical Zoom Lens for Your Smartphone
Love taking photos with your smartphone, but don't have a zoom? This tutorial by Unitips will show you how to DIY one with a few simple parts. All you'll need is 1/4" bolts, washers, and wingnuts (two each), some sheet metal, and a pair of binoculars.
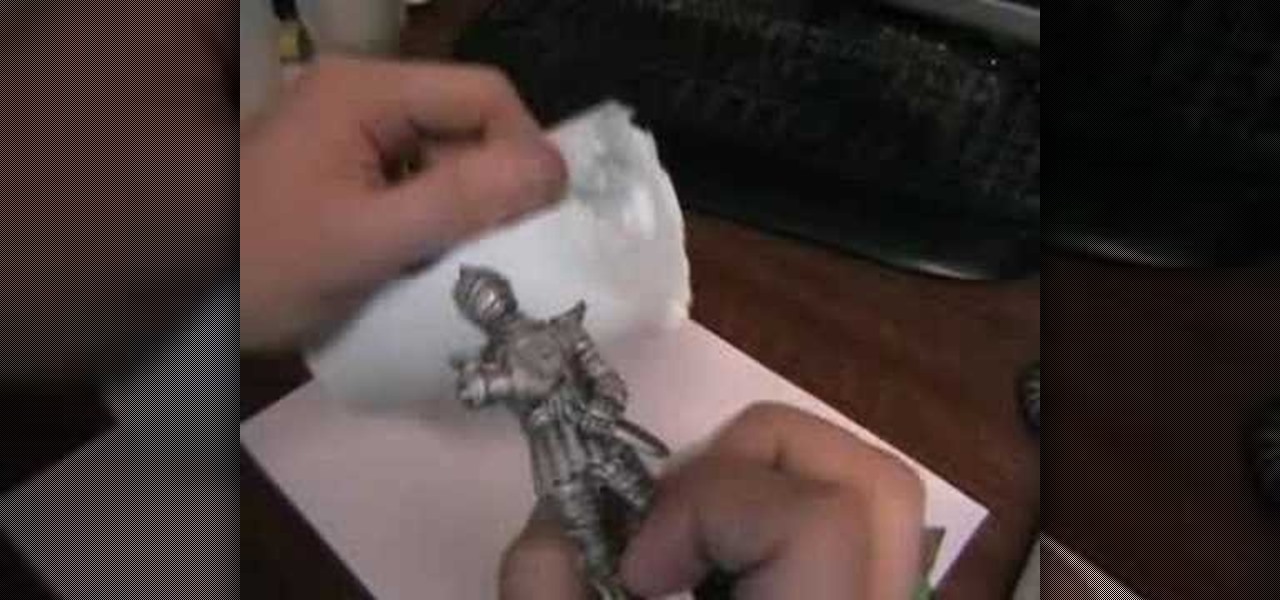
How To: Make a silicone mold of a toy figurine
In this tutorial, we learn how to make a silicone mold of a toy figurine. First, roll out clay and press the bottom of the figurine into the center. Next, use a plastic bottle to create the mold box. Cut the bottom off of the bottle, then press the bottle into the clay to make sure the figurine is centered. Now, press the bottle down into the clay and make the silicone mixture. When you're done mixing, pour it into the bottle. Pour in a stream to avoid any bubbles inside of it. Let this sit o...
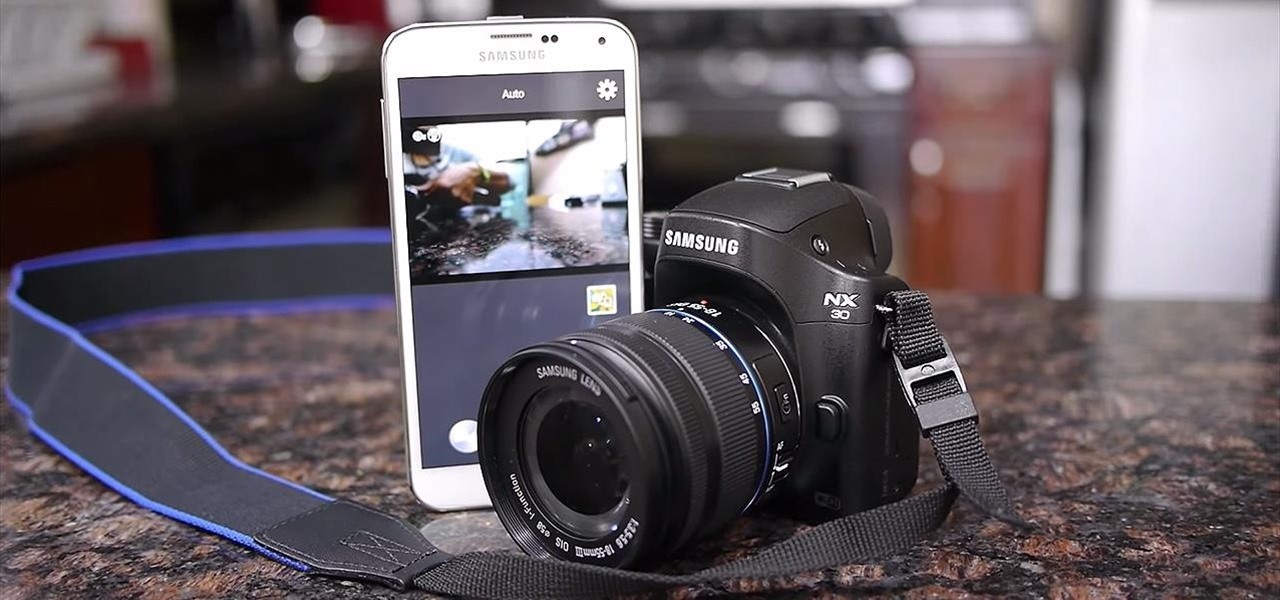
How To: Control Your Samsung Smart Camera with Your Android or iOS Device
Samsung is helping photographers in getting more utility out of their cameras with their new Samsung Smart Camera App. With it, your device becomes a powerful viewfinder for your Samsung camera, allowing you to not only frame shots, but control multiple aspects of the camera, right through your phone.
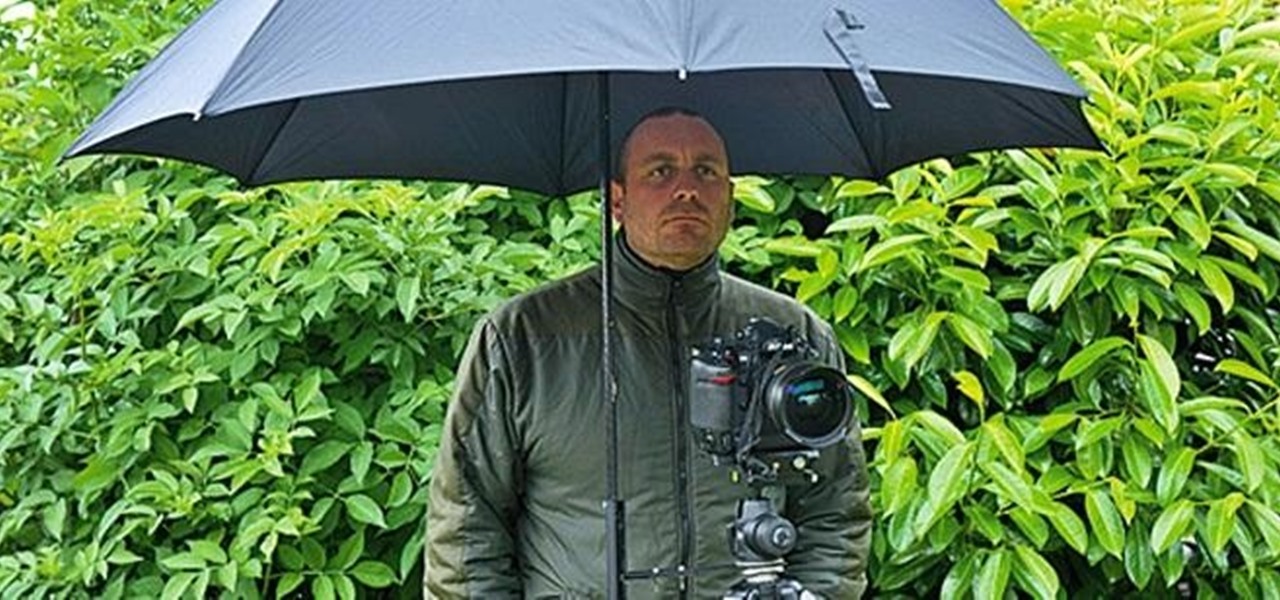
How To: Protect Your Camera from Rain with This Hands-Free DIY Umbrella Holder for Your Tripod
When you're shooting in the rain (or other extreme weather conditions), there's a lot more to think about since cameras and water don't exactly mix well. An umbrella will protect your gear, but unless you have someone to hold it for you, it can be a pain to use.
How To: Make a money clip from duct tape
In this tutorial, you will learn how to make a nifty little money clip to hold your cash together inside your pocket. A money clip is a great alternative to a wallet and makes it easier to hang on to multiple bills without losing them.
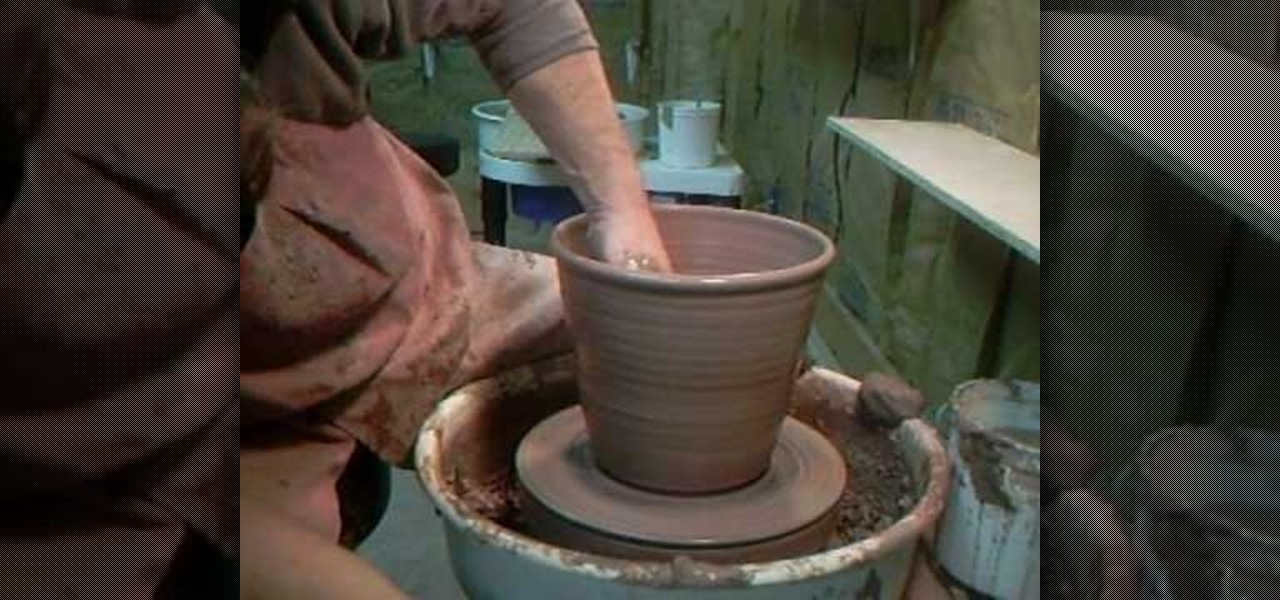
How To: Throw a 7 pound flowerpot with Simon Leach
Simon Leach has taught us a lot about ceramics and pottery in his many videos. In this concise one he demonstrates for all you at-home potters out there how to make a 3 kilogram (6 pound 10 ounce) flowerpot on the wheel. As you can see at the end of the video, that is a pretty large pot. If you can throw this, you are well on your way to being an advanced ceramics enthusiast.
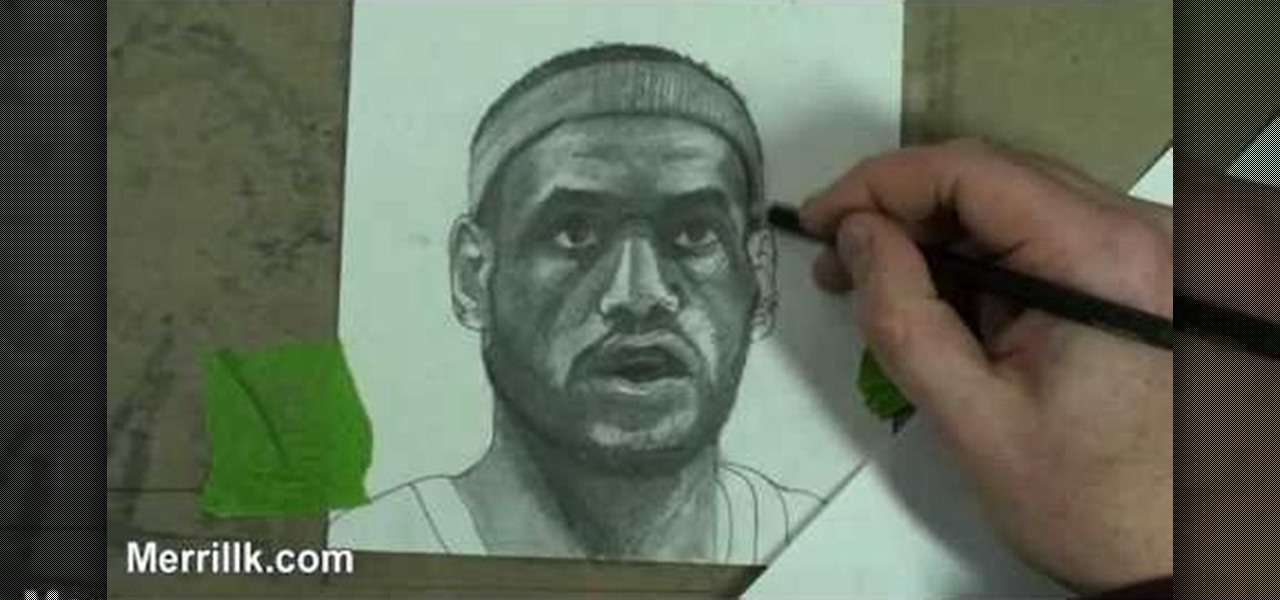
How To: Draw Lebron James
Make your own art masterpiece of a professional basketball player: Watch this tutorial to learn how to draw Lebron James. Make sure to pause the video after each step and look at the screen every few seconds while you are drawing.

How To: Draw a cool optical illusion
Optical illusions don't require fancy techniques; this one relies entirely in the details. Gather up a pen/pencil, paper, and a pair of scissors. Draw a parallelogram to be used as the template for both tabletops in this sketch. By varied angling, leg lengths, and color, the table top takes on a different appearance. Watch this video drawing tutorial and learn how to recreate this cool, artistic optical illusion.
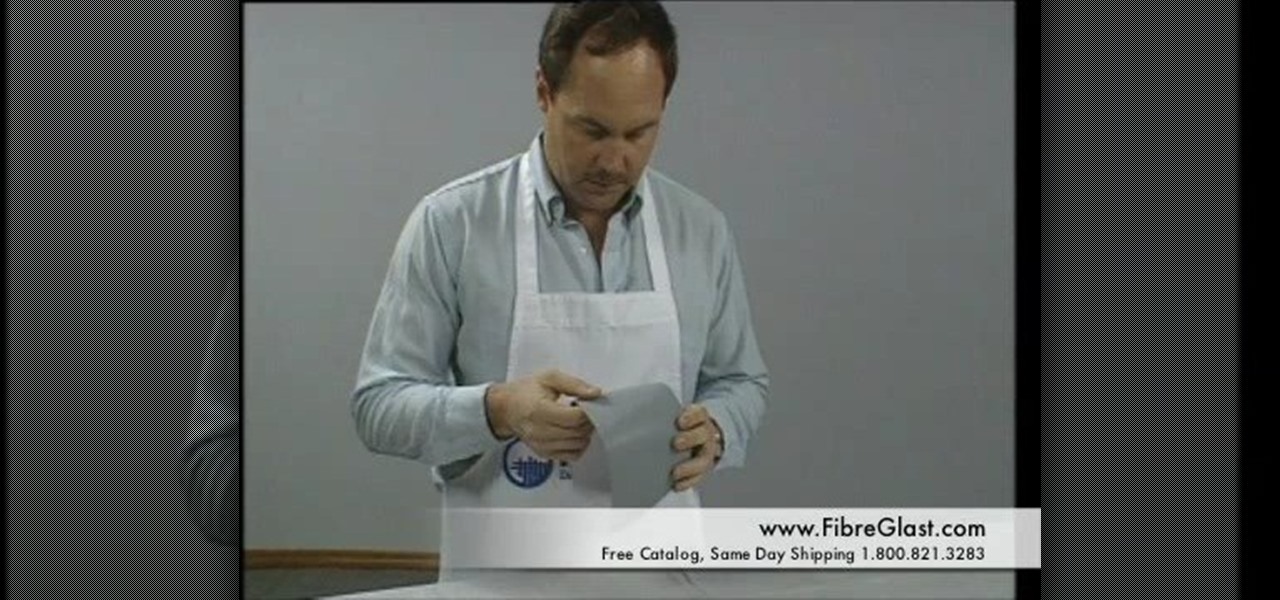
How To: Make a fiberglass mold
This how-to video series is a step-by-step guide to molding fiberglass. These videos give a simple introduction to fiberglass mold construction, explained using a model aircraft cowling but the same technique applies to any fiberglass sculpture. The entire process is detailed from plug, to mold, to finished fiberglass part. Follow along with the eight steps: develop the plug, construct the parting board, lay up the mold, release the mold from the plug, prepare the mold for fabrication, lay up...
How To: Throw a ceramic bottle or bud vase on a pottery wheel
A bud vase is a small vase, about as large as a bottle, which holds small flowers - or buds. This tutorial shows you a few different methods you can use to throw one of these small vases on a pottery wheel.
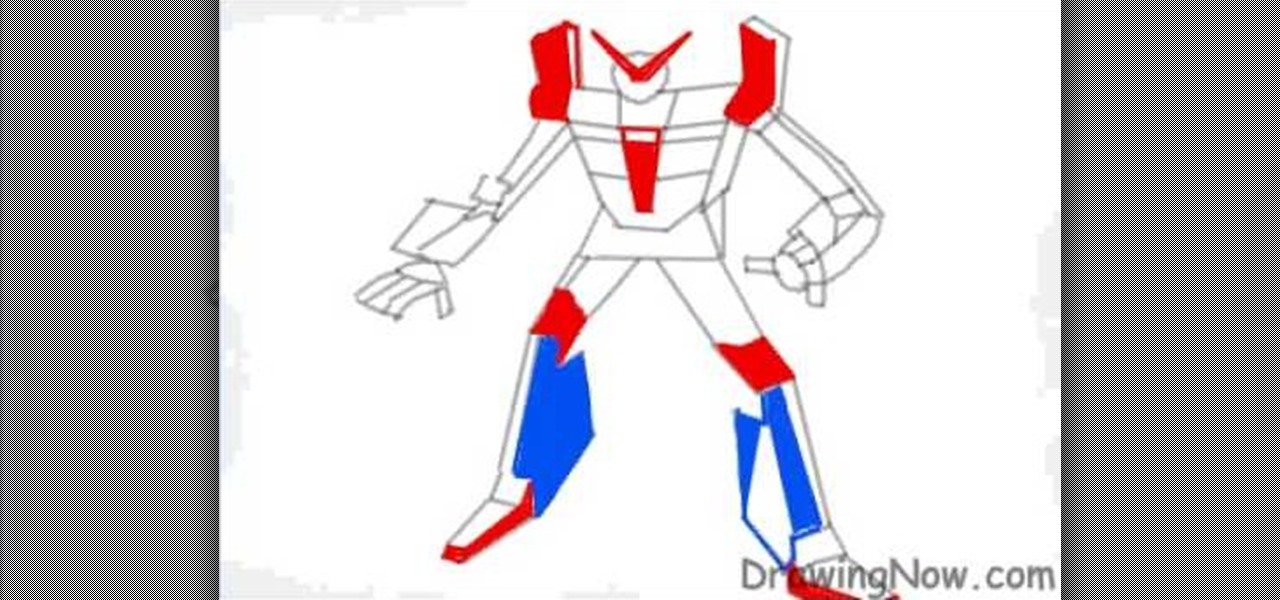
How To: Draw a robot
In this video, we learn how to draw a robot. Start off by drawing the outline of the robot, then draw in the details of the robot's exterior. Make sure to use squares to make it appear like the robot is a bunch of metal pieces put together. After this, you will fill in the robot with different colors of your choice. Make sure to add in small details around the figure to make it look more realistic. You can also add in shading to make it appear 3D. Once you are finished with the robot, make su...

How To: Draw a Pikachu Pokemon
In this video, we learn how to draw a Pikachu PokŽmon. First, you should have a picture of the character in front of you so you can better draw it. Start out by drawing the eyes and filling them in with marker. Next, draw in the rest of the face, including the nose and the mouth. After this, draw the ears at the top of the head, then connect in the middle to create the head shape. Draw the sides and bottom of the head, then draw the body. Add in circles for the cheeks, then continue to draw u...
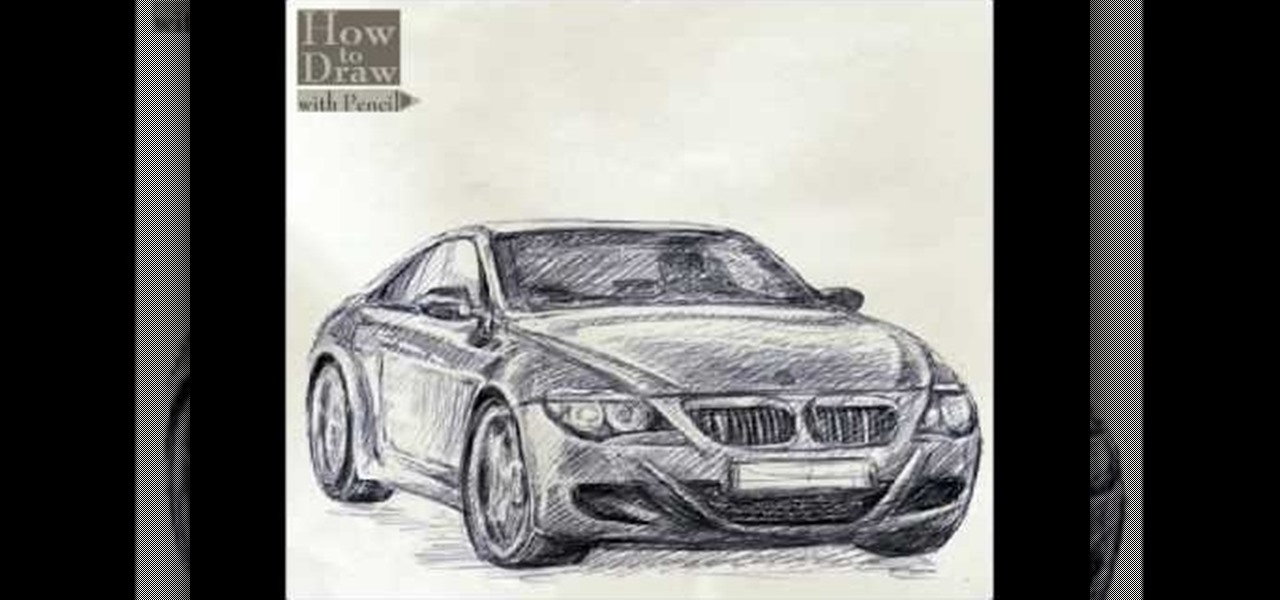
How To: Draw a BMW car
In this video, we learn how to draw a BMW car. Start off by drawing the outline of the car. After this, start to shade the drawing and add in the details of the car. Draw in the windshield, headlights, grill, license plate, and all the other small details. Make sure to use shading underneath the car to make it look more realistic. Also do shading inside the driver's seat to make it look like someone is inside of the car driving. Erase lines where you don't need them to make the car look more ...
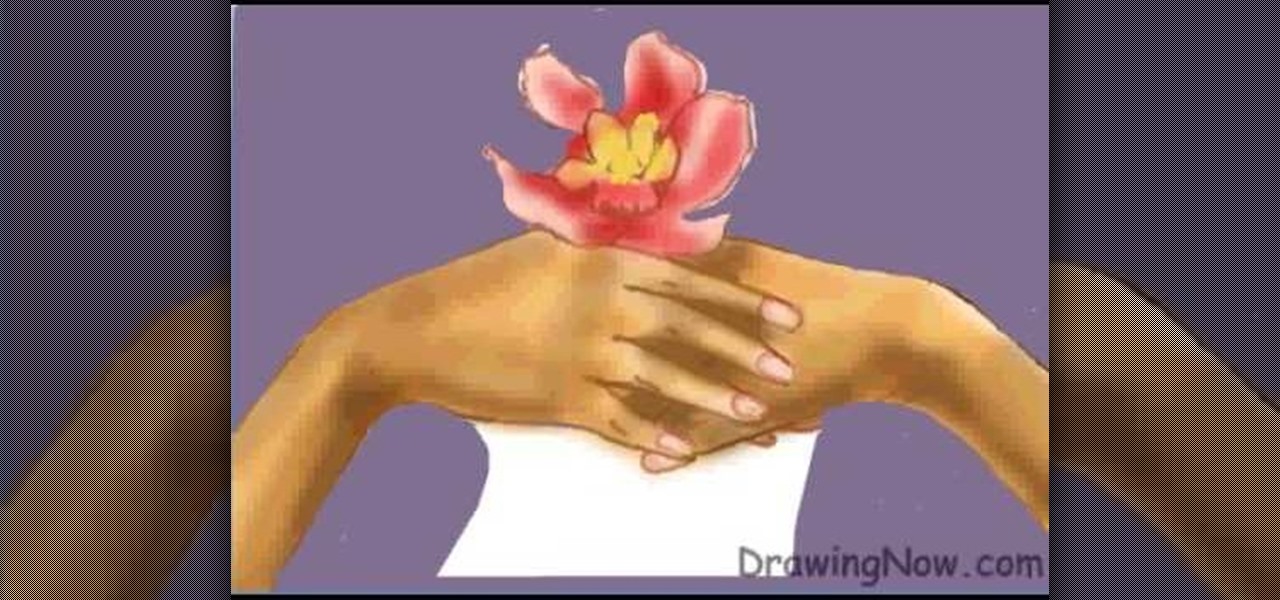
How To: Draw two clasping hands
In this video, we learn how to draw two clasping hands. Start off by drawing the two hands holding each others hand. Next, draw a circle above the hands like they are holding something. After this, draw a large flower on the circle and then start to erase the base lines from the drawing. Draw in the fingernails on the picture, then color in the skin color on the nail. Color the flower any color that you would like, then draw in the background to any color you prefer. Shade the wrist of the ar...
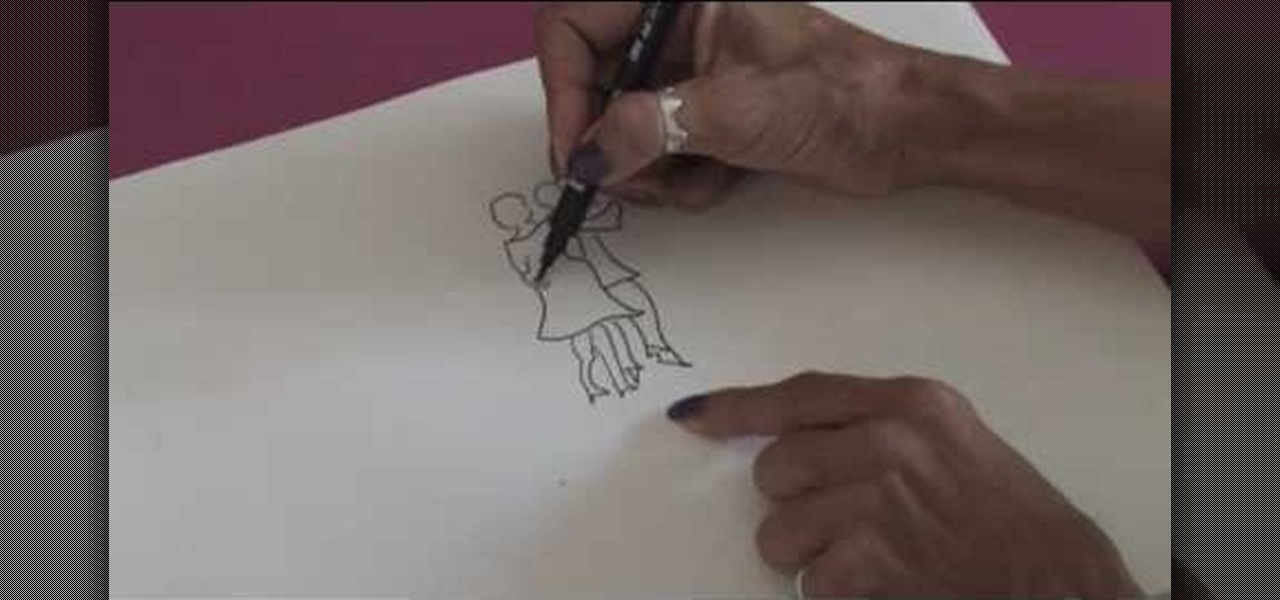
How To: Draw people in motion
In this video, we learn how to draw people in motion. Start off by drawing a shoulder and an arm. After this, draw the body, then continue down to draw the legs. Next, draw the head on the body and draw the second body dancing with the first one. Draw the clothes on then add details to make it look more realistic. Once you add lines in around the people, it gives the illusion of them moving their feet. Draw in the dance floor, then finished with additional lines around the figured. When done,...
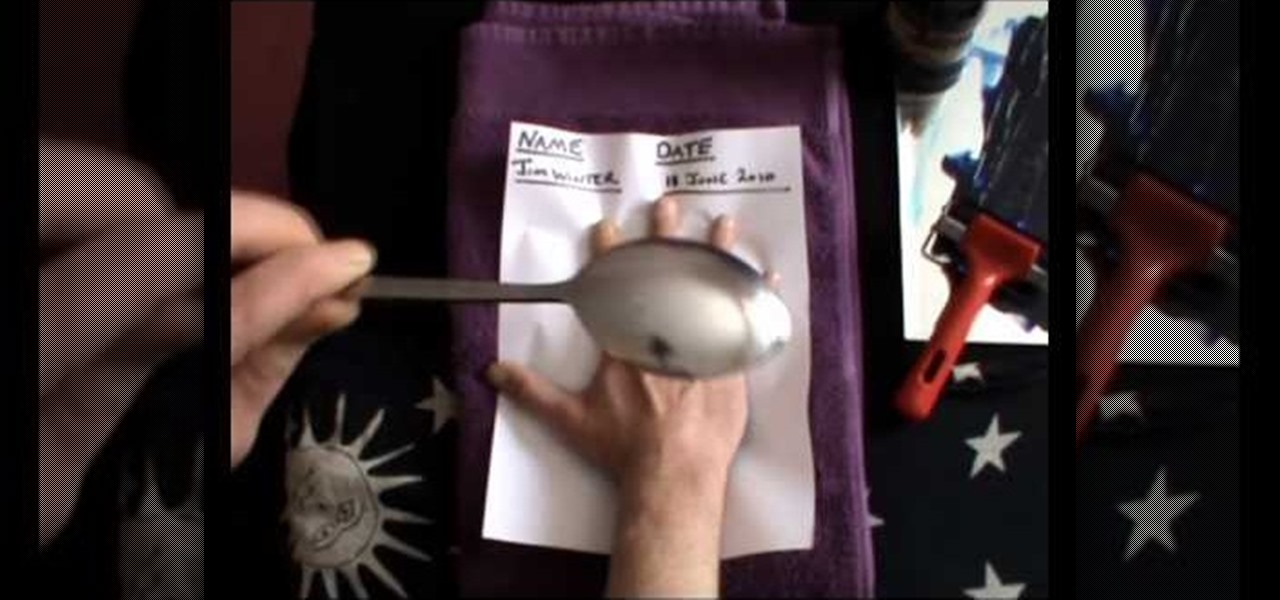
How To: Create a great quality handprint for palm-reading
Jim Winter shows you how to make a great quality handprint for your records or for palm-reading purposes. Sometimes you can read palms better with a handprint because a handprint will capture a lot of fine lines that you can't easily see with your eyes. Watch this video to learn how to make a beautiful handprint!

How To: Make a peasant (or gypsy) blouse
This video shows how to make a peasant blouse, using a T-shirt pattern from a previous video. Take the front of the T-shirt pattern and cut it out of your fabric. You will need two pieces the same, one for the front and one for the back of the blouse. Save the extra fabric from the neckline to add length to the sleeves. Place the two pieces right sides together and sew the side and shoulder seams.
Next Page
Prev Page